笔者所用 Go 版本为:go1.20.5 linux/amd64
context 意为上下文,用于管理子 goroutine 的生命周期,或维护一条调用链路中的上下文,广泛用于微服务、以及各类标准包如 http、sql 中。context 的源代码非常的少且简洁,接下来笔者直接对 context 的源代码进行分析,并对 context 的应用场景做简单的介绍。
一个接口、四种实现、六个函数 Context 定义是一个接口,具体的实现有四种:emptyCtx、cancelCtx、timerCtx 以及 valueCtx。context 包对外暴露的方法主要有六个(实际上更多一点):Background()、TODO()、WithValue()、WithCancel()、WithDeadline() 与 WithTimeout()。
可以简单看出,Context 四个方法决定了 Context 的几个用途:设置 deadline、设置取消信号,以及携带一些值。
1 2 3 4 5 6 7 8 9 10 type Context interface { Deadline() (deadline time.Time, ok bool ) Done() <-chan struct {} Err() error Value(key any) any }
从 emptyCtx 起 其中emptyCtx 只是对这四个方法进行了简单地实现:返回默认值、nil 或者 false。你可能感到很疑惑, emptyCtx 看起来像是什么也没做,恰如其名,事实上确实是这样。emptyCtx 是以 int 为基础定义的自定义类型,不过即使是其他的类型,我们也能够接受。
1 2 3 4 5 6 7 8 9 10 11 12 13 14 15 16 17 18 19 20 21 22 23 24 25 26 27 28 29 type emptyCtx int func (*emptyCtx) bool ) { return } func (*emptyCtx) chan struct {} { return nil } func (*emptyCtx) error { return nil } func (*emptyCtx) return nil } func (e *emptyCtx) string { switch e { case background: return "context.Background" case todo: return "context.TODO" } return "unknown empty Context" }
而 Background() 与 TODO() 这两个方法返回了构造好的*emptyCtx。
对于 Background,我们很快就通过它的命名能猜测到它的作用:作为上下文中最初的状态存在,像是一幅画最初的状态——一块白板,即是 Background。Background 是直接 new 的 emptyCtx,它本身不带有 deadline 或者其他一些奇怪的值,很符合作为白板。所以可以经常见到在异步处理请求的时候,为了不让带有 deadline 的 context 传入导致异步的 goroutine 被 cancel,就将为其新获取一个 Background 的 context 继续向下展开上下文。你可能不太了解为什么它适合作为白板来使用,我们先放一放,后续才是展现 context 魅力的时刻。
对于 TODO,经常用在还未决定使用哪种 context 或还无法接纳从外部传入的 context 的时候,例如一个函数的调用本应该接纳从外部传入的 context,而外部却没有传递 context 进来,所以暂时使用 TODO(),就像它的命名一样,留下一个 TODO。
1
2
3
4
5
6
7
8
9
10
11
12
13
14
15
16
var ( background = new (emptyCtx) todo = new (emptyCtx) ) func Background () return background } func TODO () return todo } func main () ctx := context.Background() ... }
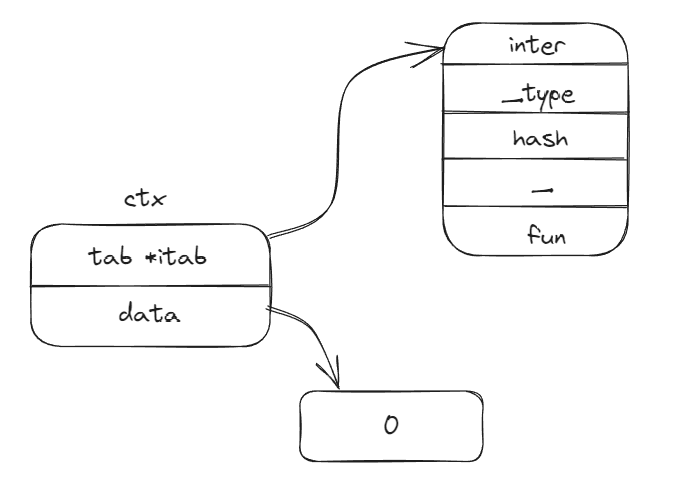
在普通的程序中,我们通过 context.Background() 获取一个初始 context,结合 iface 相关的知识,我们可以知道它的结构如下。通过结构图,我们可以更清晰地理解 context 调用链相关的知识,以及为何它被称为上下文。
再来看看 cancelCtx 我们再来看看 cancelCtx,它是一种可以被取消的 context,当它被取消时,它所有可取消的子 context 也会被取消。其中 done 用于获取 context 的取消通知,children 用于存储以它为根节点的所有可取消的子 context,以便于在根节点 context 取消时可以将它们一并取消,err 用于存储 context 被取消时存储的错误信息,mu 是用于保证这几个字段的锁,以保证 cancelCtx 是线程安全的,cause 则与 err 一样但又有点不同,它是专门用于存储解释 cancel 的 error,当 context 没被取消,则 cause 会是 nil,而 err 却不一定是 nil。
1 2 3 4 5 6 7 8 9 10 11 type cancelCtx struct { Context mu sync.Mutex done atomic.Value children map [canceler]struct {} err error cause error }
WithCancel() 函数可以将一个 context 包装为 cancelCtx,并返回一个取消函数,用于取消对应的 context。来看看它的底层,其实是通过 withCancel 进行包装,而 withCancel 则是通过 newCancelCtx 创建了一个 cancelCtx,将之前的 context 设置为了父 context。
1
2
3
4
5
6
7
8
9
10
11
12
13
14
15
16
17
18
19
20
func WithCancel (parent Context) c := withCancel(parent) return c, func () true , Canceled, nil ) } } func withCancel (parent Context) if parent == nil { panic ("cannot create context from nil parent" ) } c := newCancelCtx(parent) propagateCancel(parent, c) return c } func newCancelCtx (parent Context) return &cancelCtx{Context: parent} }
在解读 propagateCancel 之前,我们先来看看 cancelCtx 对 Done() 的实现。d.done 是一个 chan struct{},懒加载并通过 mu 来保证并发安全。
1
2
3
4
5
6
7
8
9
10
11
12
13
14
func (c *cancelCtx) chan struct {} { d := c.done.Load() if d != nil { return d.(chan struct {}) } c.mu.Lock() defer c.mu.Unlock() d = c.done.Load() if d == nil { d = make (chan struct {}) c.done.Store(d) } return d.(chan struct {}) }
我们之前提到 children 中存储了所有以它为根节点的所有可取消的 context,propagateCancel 正是用于此处,它根据父级 context 的状态来关联 cancelCtx 的 cancel 行为,在父节点被取消时,会一同取消所有可取消的子 context。
1 2 3 4 5 6 7 8 9 10 11 12 13 14 15 16 17 18 19 20 21 22 23 24 25 26 27 28 29 30 31 32 33 34 35 36 37 38 39 40 41 42 43 44 45 46 47 48 49 50 51 52 53 54 55 56 57 58 59 60 61 62 63 64 65 66 67 68 69 70 71 72 73 74 75 76 77 78 79 80 81 82 83 84 85 86 87 88 89 var goroutines atomic.Int32func propagateCancel (parent Context, child canceler) done := parent.Done() if done == nil { return } select { case <-done: child.cancel(false , parent.Err(), Cause(parent)) return default : } if p, ok := parentCancelCtx(parent); ok { p.mu.Lock() if p.err != nil { child.cancel(false , p.err, p.cause) } else { if p.children == nil { p.children = make (map [canceler]struct {}) } p.children[child] = struct {}{} } p.mu.Unlock() } else { goroutines.Add(1 ) go func () select { case <-parent.Done(): child.cancel(false , parent.Err(), Cause(parent)) case <-child.Done(): } }() } } var cancelCtxKey int func parentCancelCtx (parent Context) bool ) { done := parent.Done() if done == closedchan || done == nil { return nil , false } p, ok := parent.Value(&cancelCtxKey).(*cancelCtx) if !ok { return nil , false } pdone, _ := p.done.Load().(chan struct {}) if pdone != done { return nil , false } return p, true } func (c *cancelCtx) if key == &cancelCtxKey { return c } return value(c.Context, key) } func (c *valueCtx) if c.key == key { return c.val } return value(c.Context, key) }
等了这么久,我们终于可以看看 cancel 了。它在上述我们使用 WithCancel 时包装成一个匿名函数返回,通过调用这个函数,我们可以取消当前的 context,关闭当前 context 的 done,并取消其所有子 context。在取消时,会设置 cause。
前文中 WithCancel 在执行 cancel 时传的参数是 Canceled,Canceled 就是我们熟知的 context canceled 错误。
1 2 3 4 5 6 7 8 9 10 11 12 13 14 15 16 17 18 19 20 21 22 23 24 25 26 27 28 29 30 31 32 33 34 35 36 37 38 39 40 41 42 43 44 45 46 47 48 49 50 51 52 53 var Canceled = errors.New("context canceled" )func WithCancel (parent Context) c := withCancel(parent) return c, func () true , Canceled, nil ) } } var closedchan = make (chan struct {})func init () close (closedchan) } func (c *cancelCtx) bool , err, cause error ) { if err == nil { panic ("context: internal error: missing cancel error" ) } if cause == nil { cause = err } c.mu.Lock() if c.err != nil { c.mu.Unlock() return } c.err = err c.cause = cause d, _ := c.done.Load().(chan struct {}) if d == nil { c.done.Store(closedchan) } else { close (d) } for child := range c.children { child.cancel(false , err, cause) } c.children = nil c.mu.Unlock() if removeFromParent { removeChild(c.Context, c) } }
而使用 WithCancelCause 相较于 WithCancel 类似,区别是它会传入造成此次 cancel 的自定义 error,这个你可以自己去定义,关键时候使用能更快地排查出相关问题。
1
2
3
4
func WithCancelCause (parent Context) c := withCancel(parent) return c, func (cause error ) true , Canceled, cause) } }
Cause 用于返回 cancel 的 error。
1
2
3
4
5
6
7
8
func Cause (c Context) error { if cc, ok := c.Value(&cancelCtxKey).(*cancelCtx); ok { cc.mu.Lock() defer cc.mu.Unlock() return cc.cause } return nil }
cancelCtx 的解读到此处就快结束了,我们来收尾看看 removeChild 的逻辑:很简单,它找到第一个父 cancelCtx,将自己从它的 p.children 中移除。
1 2 3 4 5 6 7 8 9 10 11 12 func removeChild (parent Context, child canceler) p, ok := parentCancelCtx(parent) if !ok { return } p.mu.Lock() if p.children != nil { delete (p.children, child) } p.mu.Unlock() }
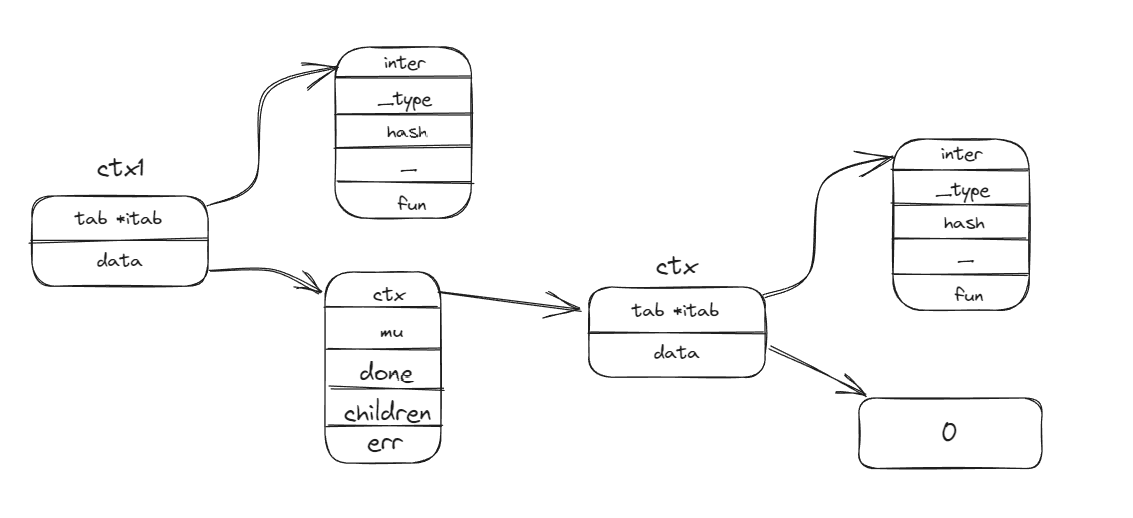
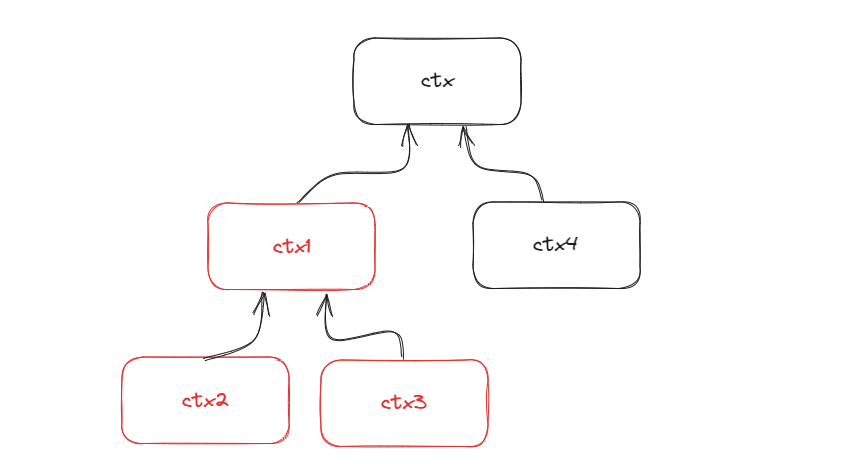
如果上述的解读不够直观,我们可以再来看看调用 WithCancel 后包装一层的结构,以此来加深对 context 上下文调用链的理解:
1
2
3
4
5
6
func main () ctx := context.Background() ctx1, cancel := context.WithCancel(ctx) defer cancel() }
timerCtx timerCtx 基于 cancelCtx,封装了一个定时器和一个截止时间。这样既可以通过 cancelCtx 主动取消,又可以通过到达 deadline 时,通过 timer 来调用取消动作,timer 也由 cancelCtx 的 mu 字段互斥锁来保护,保证了 timerCtx 也是线程安全的。
1
2
3
4
5
6
type timerCtx struct { *cancelCtx timer *time.Timer deadline time.Time }
先来看看它的 cancel,非常简洁,只是调用了一下 cancelCtx 的 cancel,并将 timer 暂停。
1
2
3
4
5
6
7
8
9
10
11
12
13
func (c *timerCtx) bool , err, cause error ) { c.cancelCtx.cancel(false , err, cause) if removeFromParent { removeChild(c.cancelCtx.Context, c) } c.mu.Lock() if c.timer != nil { c.timer.Stop() c.timer = nil } c.mu.Unlock() }
通过 WithDeadline 和 WithTimeout 都可以创建 timeCtx,区别是 withDeadline 需要指定一个时间点,而 WithTimeout 需要指定一个时间段。WithDeadline 中,先判断之前是否有 timerCtx,如果有,就看看时间是否在自己之前,是的话就不用设置了,包装个 cancelCtx 直接返回,因为父级 context 设置了更早的时间,更早的 cancel,当前 context 肯定会被影响,一并 cancel。然后根据当前给定的 context 又创建了一个新的 cancelCtx 包装 parent context,进行关联关系,并获取当前时间的差值,赋值一个 timer。
1 2 3 4 5 6 7 8 9 10 11 12 13 14 15 16 17 18 19 20 21 22 23 24 25 26 27 28 29 30 31 32 33 34 35 36 37 38 39 40 41 42 43 44 45 46 47 var DeadlineExceeded error = deadlineExceededError{}type deadlineExceededError struct {}func (deadlineExceededError) string { return "context deadline exceeded" }func (deadlineExceededError) bool { return true }func (deadlineExceededError) bool { return true }func WithDeadline (parent Context, d time.Time) if parent == nil { panic ("cannot create context from nil parent" ) } if cur, ok := parent.Deadline(); ok && cur.Before(d) { return WithCancel(parent) } c := &timerCtx{ cancelCtx: newCancelCtx(parent), deadline: d, } propagateCancel(parent, c) dur := time.Until(d) if dur <= 0 { c.cancel(true , DeadlineExceeded, nil ) return c, func () false , Canceled, nil ) } } c.mu.Lock() defer c.mu.Unlock() if c.err == nil { c.timer = time.AfterFunc(dur, func () c.cancel(true , DeadlineExceeded, nil ) }) } return c, func () true , Canceled, nil ) } } func (c *timerCtx) bool ) { return c.deadline, true }
而 WithTimeout 就是简单调用了 WithDeadline:
1
2
3
func WithTimeout (parent Context, timeout time.Duration) return WithDeadline(parent, time.Now().Add(timeout)) }
使用示例如下:
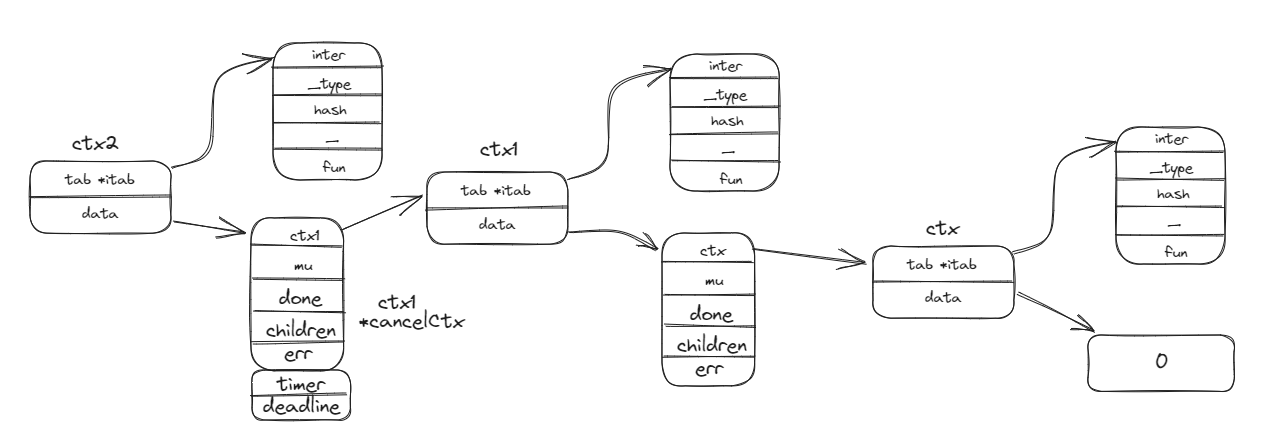
1
2
3
4
5
6
7
8
func main () ctx := context.Background() ctx1, cancel := context.WithCancel(ctx) defer cancel() ctx2, cancel2 := context.WithDeadline(ctx1, time.Now().Add(1 *time.Second)) defer cancel2() }
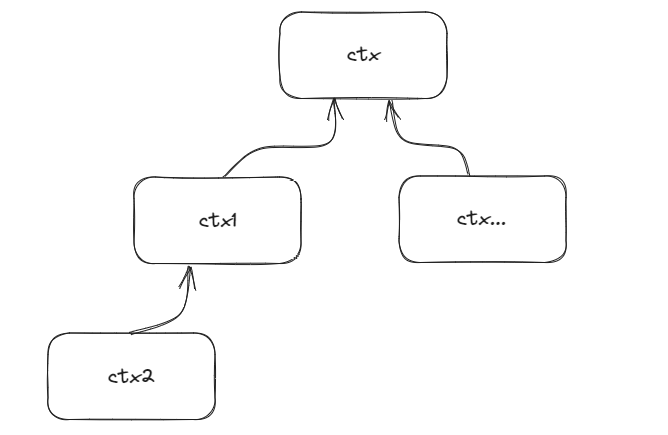
可以看到 ctx2 基于 ctx1,而 ctx1 基于 ctx,而每个 context 都可以延伸出多个子 context,进行不断的扩展和包装,于是就构成了一颗 context 树。
基于这颗 context 树,我们的 cancel 就派上用场了,一个上下文 context 可以取消其与其所有可取消的子 context:
valueCtx 最后来看看 valueCtx,它附加了一个键值对,通过 WithValue() 可以给 context 附加一个键值对的打包。
1
2
3
4
type valueCtx struct { Context key, val any }
WithValue() 简单的将 context 包装了一层,返回 valueCtx。注意此处的 key 和 context 都不能为 nil,且 key 必须是可比较类型。
1
2
3
4
5
6
7
8
9
10
11
12
func WithValue (parent Context, key, val any) if parent == nil { panic ("cannot create context from nil parent" ) } if key == nil { panic ("nil key" ) } if !reflectlite.TypeOf(key).Comparable() { panic ("key is not comparable" ) } return &valueCtx{parent, key, val} }
valueCtx 的核心函数当然是 Value(),它对比当前 context 的 key 与给定的 key 是否一致,如果一致就返回值,否则继续向上递归调用。
1
2
3
4
5
6
7
8
9
10
11
12
13
14
15
16
17
18
19
20
21
22
23
24
25
26
27
28
29
30
31
32
33
func (c *valueCtx) if c.key == key { return c.val } return value(c.Context, key) } func value (c Context, key any) for { switch ctx := c.(type ) { case *valueCtx: if key == ctx.key { return ctx.val } c = ctx.Context case *cancelCtx: if key == &cancelCtxKey { return c } c = ctx.Context case *timerCtx: if key == &cancelCtxKey { return ctx.cancelCtx } c = ctx.Context case *emptyCtx: return nil default : return c.Value(key) } } }
很显然,当 key 值是一样时,最接近当前 context 的 context 的值就会被获取到,而更高层 context 的值就会被掩盖。因此,最好将 key 自定义类型,而不是直接使用基础类型,这样容易导致 key 被覆盖。
1
2
3
4
5
6
7
8
9
10
11
12
13
14
15
16
17
18
19
20
21
22
23
24
func main () ctx := context.Background() ctx1 := context.WithValue(ctx, "key" , "value111" ) ctx2 := context.WithValue(ctx1, "key" , "value222" ) ctx3, cancel := context.WithCancel(ctx2) defer cancel() println (ctx1.Value("key" ).(string )) println (ctx2.Value("key" ).(string )) println (ctx3.Value("key" ).(string )) } type key string type keyy string func main () ctx := context.Background() var key1 keyy = "key" var key2 key = "key" ctx1 := context.WithValue(ctx, key1, "value111" ) ctx2 := context.WithValue(ctx1, key2, "value222" ) ctx3, cancel := context.WithCancel(ctx2) defer cancel() println (ctx3.Value(key1).(string )) println (ctx3.Value(key2).(string )) }
至此,context 包中大部分源码已经解读完毕,我们可以聊一聊应用了。
应用 上下文数据传递 在 Java 中有 Threadlocal,而 Go 中则有 Context。在一个请求链路中,常常有一定的标识,比如这个请求是用户 A 发起的,那么整条链路中会有很多地方需要去获取用户 A 的一些信息,此时就可以通过 context 去存储相关的信息,然后借助 context 进行传递。当然,这也仅限于当个服务内,我们以 grpc 沟通时,在调用链路中,一个服务中的 context 携带的信息不可能直接在下游服务的 context 就有,通常是在两个服务间通过 grpc metadata 进行传递,通过 client 和 server 注册的 Interceptor 对 context 和 metadata 进行转换。http 的话就可以根据请求头携带相关的值。
超时控制 context 广泛用于微服务、http 以及 sql 包等的超时控制。调用 cancel 能释放与该 context 关联的资源,所以在这个 context 完成它的使命时,应该尽快调用 cancel,通常我们会在调用完成后使用 defer cancel()。在以下 http 请求示例中,为什么defer cancel()不放在resp, err := client.Do(req)下面一行呢,其实这是一个常见的误区,因为这样会导致 cancel 函数的调用在超时情况下失去作用。在网络请求超时的情况下,client.Do 可能会阻塞,而 cancel 函数将无法被调用,无法取消上下文,从而可能导致资源泄漏或意外的等待。
1
2
3
4
5
6
7
8
9
10
11
12
13
14
15
16
17
18
19
20
21
22
23
24
25
26
27
28
29
30
31
32
33
package mainimport ( "context" "fmt" "net/http" "time" ) func main () ctx, cancel := context.WithTimeout(context.Background(), 5 *time.Second) defer cancel() req, err := http.NewRequest("GET" , "https://anyview.fun" , nil ) if err != nil { fmt.Println("Error creating request:" , err) return } req = req.WithContext(ctx) client := http.DefaultClient resp, err := client.Do(req) if err != nil { fmt.Println("Error sending request:" , err) return } defer resp.Body.Close() fmt.Println("Response status:" , resp.Status) }
在net包中/src/net/http/transport.go:512可以看到通过对ctx.Done的监听来控制context的超时。很常见的一种用法,也说明了一点:context的超时控制不是通过直接中断 Goroutine 来实现的,而是通过在 Goroutine 中检查 context 的状态来实现的。在请求中,当使用一个派生自当前 context 的子 context 时,如果主 context 被取消,context 中的取消信号将传递给请求操作,通知它们停止等待和执行。
1 2 3 4 5 6 7 8 9 10 11 12 13 14 func (t *Transport) error ) { ... for { select { case <-ctx.Done(): req.closeBody() return nil , ctx.Err() default : } ... } ... }
sql 也类似,在多个地方监听和检查 context 的信号状态,以此来控制自己 goroutine 的生命周期。
1
2
3
4
5
6
7
8
9
10
11
12
13
14
15
16
17
18
19
20
21
22
23
24
25
26
27
28
29
30
31
32
33
34
35
36
37
38
39
40
41
42
package mainimport ( "context" "database/sql" "fmt" "time" _ "github.com/go-sql-driver/mysql" ) func main () db, err := sql.Open("mysql" , "user:password@tcp(127.0.0.1:3306)/database" ) if err != nil { fmt.Println("Error connecting to database:" , err) return } defer db.Close() ctx, cancel := context.WithTimeout(context.Background(), 2 *time.Second) defer cancel() rows, err := db.QueryContext(ctx, "SELECT * FROM users" ) if err != nil { fmt.Println("Error executing query:" , err) return } defer rows.Close() for rows.Next() { var id int var username string err := rows.Scan(&id, &username) if err != nil { fmt.Println("Error scanning row:" , err) return } fmt.Printf("User: ID=%d, Username=%s\n" , id, username) } }
1 2 3 4 5 6 7 8 9 10 11 12 13 14 15 16 17 18 19 20 21 22 23 24 25 26 func (db *DB) error ) { ... select { default : case <-ctx.Done(): db.mu.Unlock() return nil , ctx.Err() } ... } func ctxDriverQuery (ctx context.Context, queryerCtx driver.QueryerContext, queryer driver.Queryer, query string , nvdargs []driver.NamedValue) error ) { ... select { default : case <-ctx.Done(): return nil , ctx.Err() } ... }
而在异步场景下,context 就不能这样依靠父 context 直接构造子 context 继续传递上下文。最好的方法当然是通过 context.Background() 为其重新开启一段上下文。但当我们有一些特定的场景需要异步且还是需要上下文的时候怎么办呢?最好使用其余的东西去存储你需要的相关上下文信息,而不是想着拷贝 context 继续向下执行,否则代码会变得难以维护。
1
2
3
4
5
6
7
8
9
10
11
12
13
14
15
16
17
18
19
20
21
22
23
package mainimport ( "context" "fmt" "sync" ) func main () ctx := context.Background() add(ctx, 1 , 2 ) wg := &sync.WaitGroup{} wg.Add(1 ) go func () add(context.Background(), 2 , 3 ) wg.Done() }() wg.Wait() } func add (ctx context.Context, x, y int ) fmt.Println(x + y) }
链路追踪 链路追踪的本质也是通过维护一条链路上同一个 trace-id,在 client 和 server 的 Interceptor、或者一些 log sdk、db 集成的 sdk 进行上报,通过 jaeger 等收集相关的数据进行展示。
笔者写了个基于 Opentelemetry 集成了 Jaeger 的 grpc 中间件 作为学习 demo。主要也是处理上下文数据传递中的细节,来达到一条链路上一致的 trace-id 和 span。
在为 dtm 贡献时,笔者发现,基于分布式事务的 dtm 事务管理器在处理请求时以异步的形式来进行更好,能够减少分布式事务中产生的数据不一致的情况,提高分布式事务的效率。这会导致 context 无法作为上下文继续向下传递。而一些数据已经在 Interceptor 处理过放到 context 里了,比如 opentelemetry 中 trace 的 span、trace 啥的,这里真正好的方法是在新的 background 拷贝一些需要继续向下传递的值,然后再将新的 context 继续向下传递。
此外,笔者也借此机会写了完整拷贝 context 值的方法,但是不推荐使用,仅供参考。以下的代码由于在 Go1.19.3-1.20.5 之间某个版本迭代中,timerCtx 的结构从 cancelCtx 更改为了*cancelCtx,所以只适用于后者的版本,相应的改动是将以下 timerCtx 的结构也更改为对应的结构。
1
2
3
4
5
6
7
8
9
10
11
12
13
14
15
16
17
18
19
20
21
22
23
24
25
26
27
28
29
30
31
32
33
34
35
36
37
38
39
40
41
42
43
44
45
46
47
48
49
50
51
52
53
54
55
56
57
58
59
60
61
62
63
64
65
66
67
68
69
70
71
72
type iface struct { itab, data uintptr } type valueCtx struct { context.Context key, value any } type cancelCtx struct { context.Context } type timerCtx struct { cancelCtx *cancelCtx } func (*timerCtx) bool ) { return } func (*timerCtx) chan struct {} { return nil } func (*timerCtx) error { return nil } func (*timerCtx) return nil } func (e *timerCtx) string { return "" } func CopyContext (ctx context.Context) if ctx == nil { return ctx } newCtx := context.Background() kv := make (map [interface {}]interface {}) getKeyValues(ctx, kv) for k, v := range kv { newCtx = context.WithValue(newCtx, k, v) } return newCtx } func getKeyValues (ctx context.Context, kv map [interface {}]interface {}) rtType := reflect.TypeOf(ctx).String() if rtType == "*context.emptyCtx" { return } ictx := *(*iface)(unsafe.Pointer(&ctx)) if ictx.data == 0 { return } valCtx := (*valueCtx)(unsafe.Pointer(ictx.data)) if valCtx.key != nil && valCtx.value != nil && rtType == "*context.valueCtx" { kv[valCtx.key] = valCtx.value } if rtType == "*context.timerCtx" { tCtx := (*timerCtx)(unsafe.Pointer(ictx.data)) getKeyValues(tCtx.cancelCtx, kv) return } getKeyValues(valCtx.Context, kv) }
由于反射的做法不兼容不同的 Go 版本,所以也可以尝试自定义一个 context 去阻断父节点的 cancel,具体代码如下:
1
2
3
4
5
6
7
8
9
10
11
12
13
14
15
16
17
18
19
20
type asyncCtx struct { context.Context } func (a *asyncCtx) bool ) { return } func (a *asyncCtx) chan struct {} { return nil } func NewAsyncContext (ctx context.Context) if ctx == nil { return nil } return &asyncCtx{Context: ctx} }
总结 本文从源码入手解析了精致的 context 包,感叹作者设计优秀的同时,也介绍了相关的应用场景。